
Push Troubleshooting
This article covers the four issues most often reported for Android push: subscribers not appearing in NVECTA, Sender ID mismatch errors, campaigns marked Sent that never arrive on the device, and click redirection not working. Work through each Part in order — every step assumes the one before it passed.
Before you start, confirm the app is integrated as described in Push Notifications.
Part 1 — Push subscribers not showing in NVECTA
If a device has installed the app but never appears in NVECTA as a push subscriber, registration is failing at one of five points. Work through the checks in order; the first log line that is missing tells you where the flow breaks.
A. Verify the Brand ID
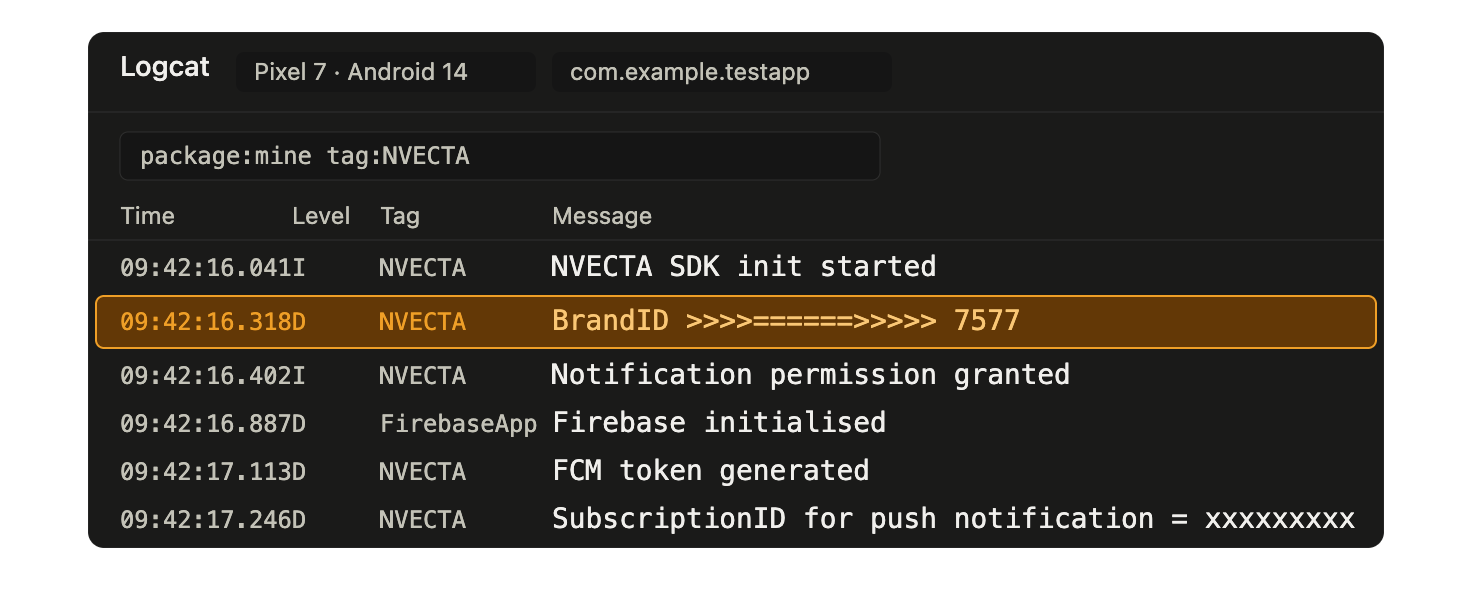
Where: Android Studio Logcat, filtered on your app process.
Expected log line in Logcat: BrandID >>>>======>>>>> 7577
Confirm that the value in the log matches the Brand ID in NVECTA. If it does not match, check the following.
- The SDK is initialised before any other NVECTA call is made.
- The Brand ID passed to the SDK is the one shown in NVECTA.
- The build is pointing at the correct environment (Production or Staging).
B. Verify notification permission
On Android 13 and above the app must request the notification permission at runtime, and the user has to tap Allow. Confirm that the prompt is shown, that permission is granted, and that notifications are still enabled for the app in the device settings. The SDK supports a custom prompt, its own popup, or the native system prompt — see Notification Runtime Permission.
If permission is denied, push registration or delivery can fail, depending on the Android version and how the app handles the refusal.
C. Verify the Push Subscription ID
Where: Logcat.
Expected log line in Logcat: SubscriptionID for push notification = xxxxxxxxx
If this line appears, the device has completed push registration with the SDK, so move to Step 5. If it is missing, work through the Firebase Cloud Messaging checks in Step 4.
D. Verify the Firebase Cloud Messaging integration
These checks assume Firebase was set up as described in Register FCM Keys.
D1 Firebase initialisation
Confirm that Firebase initialises. If the initialisation log is missing, check the following.
- The FCM SDK version in
build.gradleis supported and not outdated. google-services.jsonbelongs to the Firebase project this app actually uses.- The Firebase Gradle plugins are configured correctly.
Firebase Messaging services are occasionally unavailable. If the configuration is correct and initialisation still fails, wait up to two hours and retry before escalating.
D2 FCM token generation
Confirm that the FCM token is generated, that FirebaseMessagingService is implemented correctly, and that the device has an internet connection. If no FCM token is generated at all, the problem is in the Firebase integration, not in the NVECTA SDK.
E. Verify the subscription API request
If the Push Subscription ID is generated but the device still does not appear in NVECTA, the subscription call is failing. In Logcat, confirm the following.
- There are no authentication errors.
- There are no timeout or SSL failures.
- There are no HTTP or network exception logs.
If the request fails, the SDK logs the reason. Use it to decide whether you are looking at a credential, a network or a payload problem.
Part 2 — Sender ID mismatch
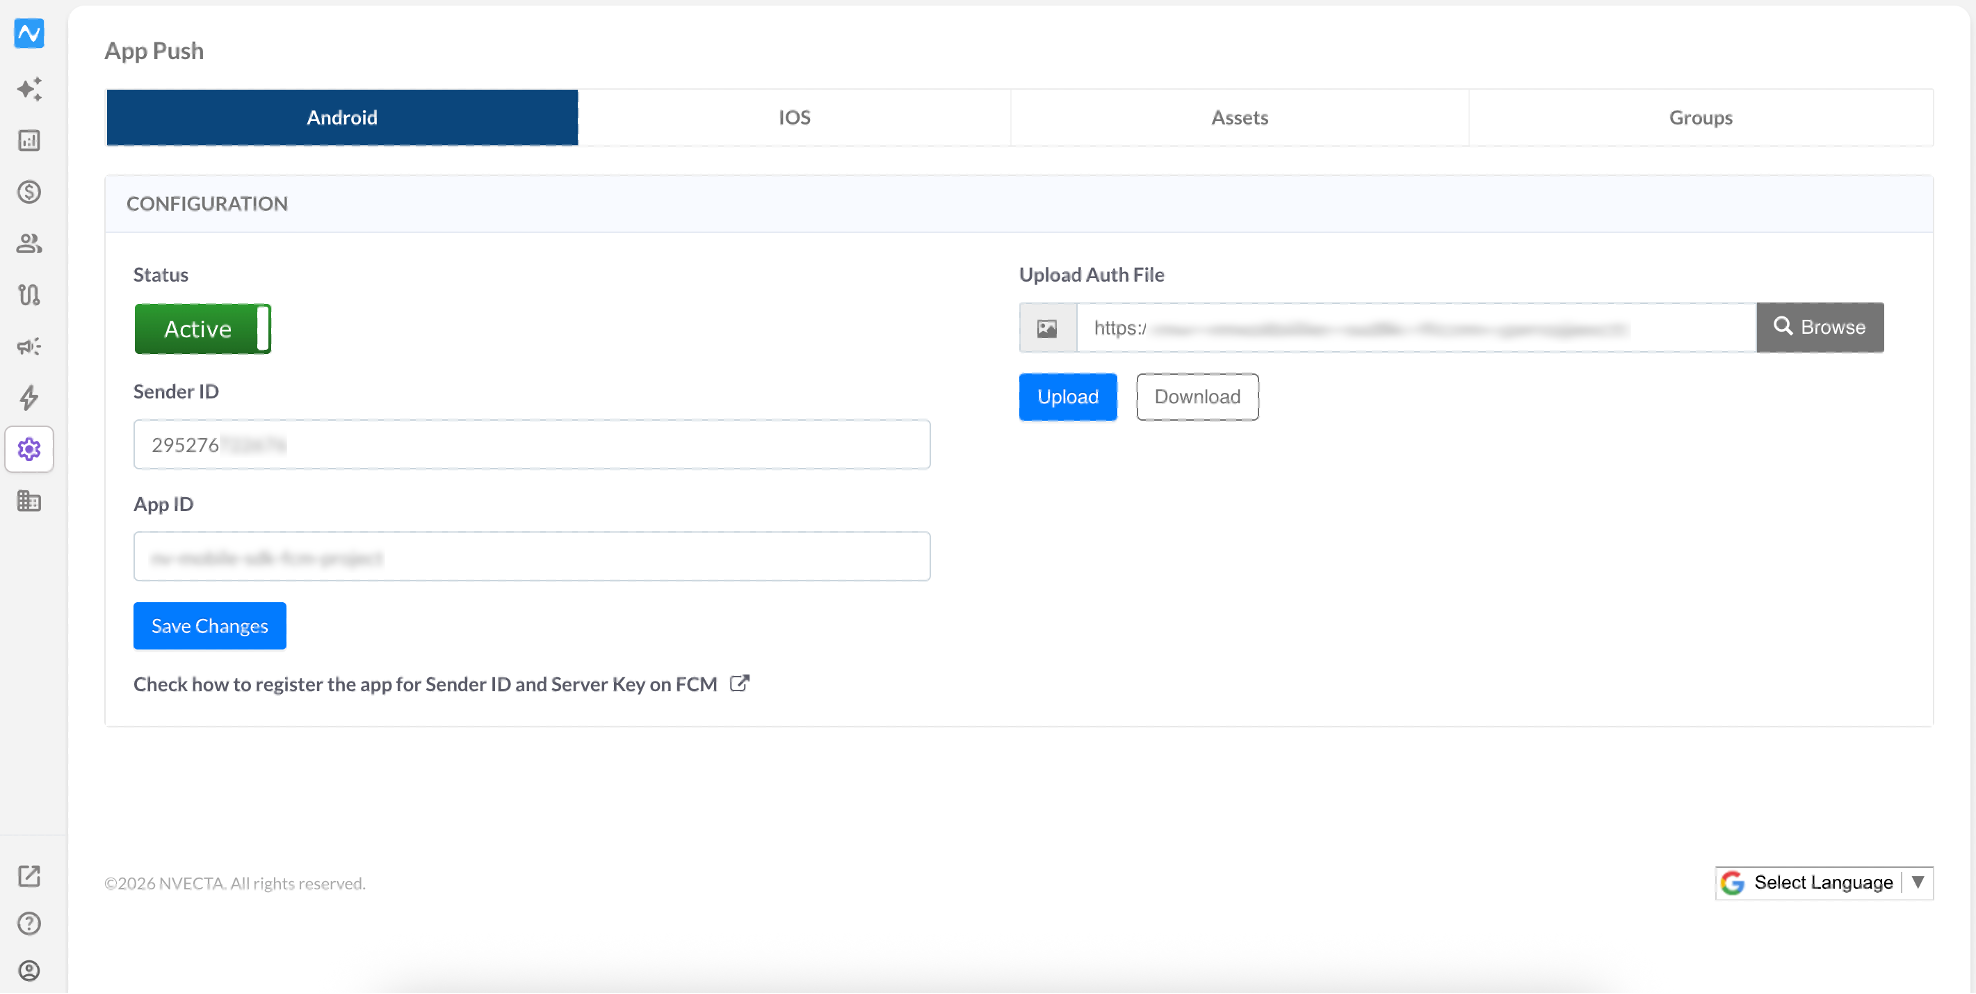
The Sender ID is your Firebase project number, and it has to be identical in three places: google-services.json, the Firebase console, and NVECTA. If sending fails with a Sender ID mismatch error, check the following.
- The app is pointed at the correct Firebase project.
google-services.jsoncomes from that same project.- The server credentials uploaded in NVECTA come from that same project.
- The app package name matches the one registered in Firebase.
Credentials are uploaded under Settings > App Push > Android — the auth file, the Sender ID, and the App ID (project ID). The full procedure is in Register FCM Keys.
A step-by-step fix for this specific error is in the guide to the Mismatch SenderID error.
Part 3 — Push sent but not delivered on the device
If a campaign reports as Sent but the notification never reaches the device, the message is either not being received by the app or not being handed to the SDK.
Step 1. Verify the Firebase Messaging Service registration
AndroidManifest.xml must register a service for com.google.firebase.MESSAGING_EVENT. That is either NVECTA's own service — com.notifyvisitors.notifyvisitors.NVFirebaseMessagingService — or a FirebaseMessagingService of your own. If no service is registered, FCM messages are never received.
Step 2. Verify a custom FCM implementation
If the app uses its own FirebaseMessagingService, the received payload has to be forwarded to the NVECTA SDK with isPayloadFromNvPlatform() and getNV_FCMPayload(). If the payload never reaches the SDK, delivery, tracking and click handling all stop working. The implementation is described in Push Notifications.
Step 3. Verify the device configuration
When the service is registered and the payload is forwarded, the remaining causes are on the device itself. Check the following.
- The device has an active internet connection.
- Notifications are enabled for the app.
- Notification permission is granted on Android 13 and above.
- The device is not in battery optimisation or restricted background mode.
- The FCM token is still valid and active.
Manufacturer battery and autostart restrictions are a frequent cause of this. If the device is one of the following, apply the matching steps.
| Device | Steps |
|---|---|
| Asus | Check your app in the Auto-start Manager. |
| Huawei | Settings → Advanced Settings or Power Saving → Battery Manager or Protected Apps → select your app. Then Settings → Apps or Notification Manager → Advanced or Notify for your app → Ignore Battery Optimizations → select your app. Then Settings → Notification Panel & Status Bar → Notification Center → select your app and enable Allow Notifications and Priority Display. On pre-EMUI 5.0 or Android 7, Settings → Protected apps → check your app. |
| LeEco/LeTV | Settings → Permissions → Manage Auto Launch → select your app. Then Settings → Battery → Power Saving Management → App Protection → select your app. |
| Lenovo | Settings → Power Manager → Background App Management → select your app. |
| OnePlus | Settings → Apps or Advanced or Battery → gear icon or Recent Apps Management or Apps not optimized or Battery Optimizations → App Autolaunch or Ensure Normal clear enabled or Don't Optimize → toggle your app. |
| Samsung | Settings → Device Management → Battery → Unmonitored apps → add your app. Then Settings → Apps → your app → App Settings → Notifications → Set as Priority. |
| Sony | Tap the battery icon → Power Management → STAMINA mode → Apps active in standby → add your app. |
| Xiaomi/Redmi | Security app → Permissions → Autostart → enable your app. Then Settings → Developer Options → disable Memory optimization. To show Developer Options, go to Settings → About and tap MIUI 8 times. |
The SDK can also request autostart permission from inside the app — see AutoStart.
Part 4 — Push click redirection not working
If the notification opens the app but the configured destination is never reached, the payload is either not arriving, not being read, or being overridden.
Step 1. Verify the click callback
The Push_Clicked callback has to be registered in the right component and early enough in the lifecycle. Registered too late, it never receives the click payload.
Step 2. Verify payload handling
From SDK v5.4.11 the click data arrives as a JSON object under the key notifyvisitors_cta, alongside the raw intent extras that earlier versions sent. Keys are case-sensitive: actionURL, target, callToImageIndex, parameterIndex and parameters have to match exactly what the app reads. Print the intent data and compare it against your click handling logic. Both formats are described in Page Redirection/Navigation.
Step 3. Verify the redirection logic
The app must not override the SDK's navigation. A custom PendingIntent, custom notification click handling, or manual Activity navigation takes precedence, and the configured redirection never runs.
Step 4. Verify the campaign configuration
Check the redirection option set on the campaign against the destination you expect. Push campaigns offer six options: Navigate in App, Navigate to Webpage, Navigate to Third-party app, Share, Call and App Link.
For a deep link, universal link or app link, select App Link, supported from SDK v5.4.11 onwards.
Navigate in App expects an activity path such as com.example.testapp.MainActivity, not a deep-link URL. Choosing it for a deep link opens the app without redirecting to the intended screen.
Quick troubleshooting matrix
| Issue | Where to look | Primary checks |
|---|---|---|
| Push subscribers not showing | Logcat | Brand ID → notification permission → Push Subscription ID → Firebase initialisation → FCM token → subscription API response → exception logs |
| Sender ID mismatch | Firebase console and NVECTA | Firebase project → google-services.json → server credentials → package name |
| Sent but not delivered | AndroidManifest.xml and the device | FirebaseMessagingService registration → payload forwarding → notification permission → device restrictions → valid FCM token |
| Click redirection not working | App code and campaign settings | Callback registration → payload received → case-sensitive keys → navigation override → campaign redirection option |
Updated about 1 month ago